> ## Documentation Index
> Fetch the complete documentation index at: https://nango-marcin-get-deployments-docs.mintlify.site/llms.txt
> Use this file to discover all available pages before exploring further.
# UKG Ready - How do I link my account?
# Overview
To authenticate with UKG Ready, you need:
1. **Client ID** - Your OAuth application's client identifier
2. **Client Secret** - Your OAuth application's secret key
3. **Company ID** - Your unique company identifier in UKG
4. **Hostname** - Your UKG Ready instance's hostname (e.g., secure.us.rdy.ukg)
This guide will walk you through obtaining these within UKG Ready.
### Prerequisites:
* You must have an account with UKG Pro system administrator.
### Instructions:
#### Step 1: Set Up Security Profile Permissions
1. Sign in to your [UKG Ready](https://www.ukg.com/ukg-login) account.
2. Navigate to **Settings** > **Profiles/Policies** > **Security**.
3. Click on the **New Security Profile** button.
 4. Enter a **Name**, optionally add a **Description**, and set the profile to **Active**.
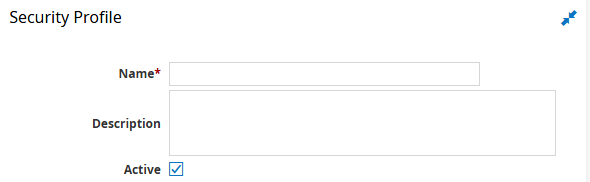 5. In the **Security Items** section, configure the required permissions across different areas based on your specific use cases, such as Global, HR, and Modules.
6. Click **Save** to apply the security profile changes.
#### Step 2: Generating Your Client Credentials
1. Go to **Settings** > **Global Setup** > **Company Setup**.
2. Find the **OAuth Applications** widget.
3. Choose the **Machine to Machine** type, and generate a **Client ID** and **Client Secret**.
#### Step 3: Finding Your Company ID
1. Click the hamburger ☰ button.
2. Navigate to **My team** > **My employees** > **Employee info**.
3. Click **Select columns**. For detailed information, see [Get company ID](https://ukg.cloudapper.ai/ukg-help/how-to-get-company-id-and-company-name-in-ukg-ready/).
4. Select Add/Remove columns.
5. Add **Company ID**.
6. Click **Apply**.
7. Your **Company ID** will be displayed for you.
#### Step 4: Finding Your Hostname
1. Click the hamburger ☰ button on the top left.
2. Click **Settings** menu option, then click **Global Setup** to expand the menu.
3. Click **Company Setup**.
4. This page will display your **Hostname**. This value is contained in your domain's URL login.
* **Example:** If your login service URL is listed as `https://secure.us.rdy.ukg/ta/company.login`, then your Hostname is `secure.us.rdy.ukg`
#### Step 5: Enter credentials in the Connect UI
Once you have your credentials:
1. Open the form where you need to authenticate with UKG Ready.
2. Enter your **Client ID**, **Client Secret**, **Company ID** and **Hostname** in their respective fields.
3. Submit the form, and you should be successfully authenticated.
5. In the **Security Items** section, configure the required permissions across different areas based on your specific use cases, such as Global, HR, and Modules.
6. Click **Save** to apply the security profile changes.
#### Step 2: Generating Your Client Credentials
1. Go to **Settings** > **Global Setup** > **Company Setup**.
2. Find the **OAuth Applications** widget.
3. Choose the **Machine to Machine** type, and generate a **Client ID** and **Client Secret**.
#### Step 3: Finding Your Company ID
1. Click the hamburger ☰ button.
2. Navigate to **My team** > **My employees** > **Employee info**.
3. Click **Select columns**. For detailed information, see [Get company ID](https://ukg.cloudapper.ai/ukg-help/how-to-get-company-id-and-company-name-in-ukg-ready/).
4. Select Add/Remove columns.
5. Add **Company ID**.
6. Click **Apply**.
7. Your **Company ID** will be displayed for you.
#### Step 4: Finding Your Hostname
1. Click the hamburger ☰ button on the top left.
2. Click **Settings** menu option, then click **Global Setup** to expand the menu.
3. Click **Company Setup**.
4. This page will display your **Hostname**. This value is contained in your domain's URL login.
* **Example:** If your login service URL is listed as `https://secure.us.rdy.ukg/ta/company.login`, then your Hostname is `secure.us.rdy.ukg`
#### Step 5: Enter credentials in the Connect UI
Once you have your credentials:
1. Open the form where you need to authenticate with UKG Ready.
2. Enter your **Client ID**, **Client Secret**, **Company ID** and **Hostname** in their respective fields.
3. Submit the form, and you should be successfully authenticated.
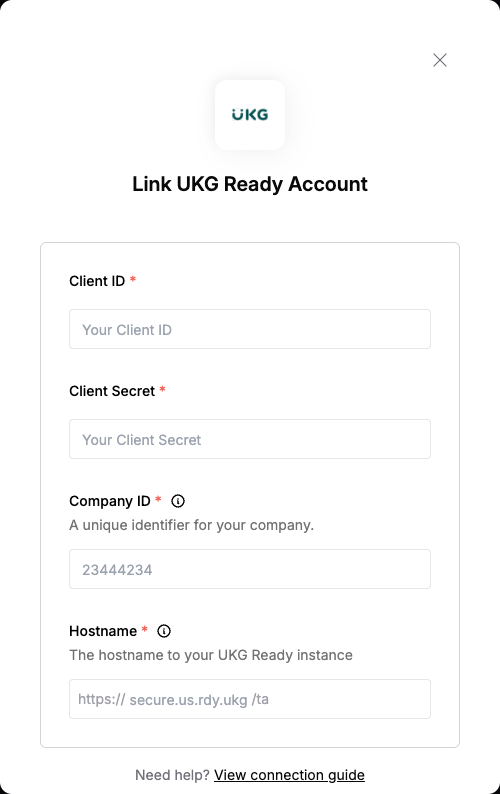 You are now connected to UKG Ready.