> ## Documentation Index
> Fetch the complete documentation index at: https://nango-marcin-get-deployments-docs.mintlify.site/llms.txt
> Use this file to discover all available pages before exploring further.
# Tableau - How do I link my account?
# Overview
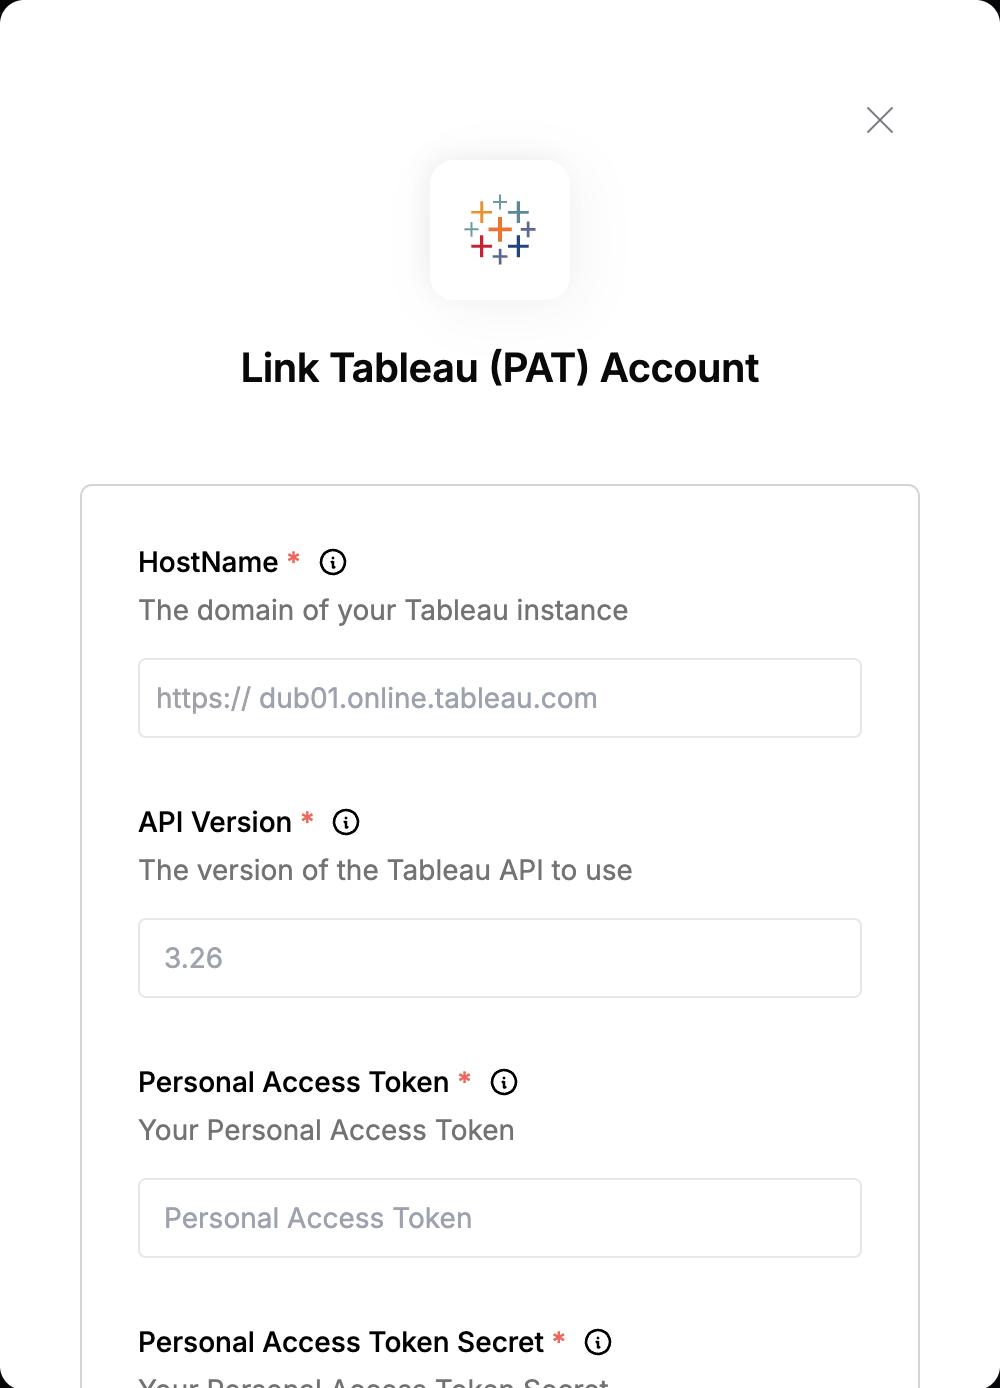
To authenticate with Tableau, you need:
1. **Personal Access Token** - This is the name/label you assigned to the Personal Access Token when you created it in Tableau.
2. **Personal Access Token Secret** - This is the secret/token string that was generated along with the token name acting like a password.
3. **HostName** - This is your Tableau **server domain or host URL** (not including protocol).
4. **API Version** - This is the version of the **Tableau REST API** you want to connect to which must match the version supported by your Tableau environment.
5. **Content Url (Optional)** - This identifies the site within your Tableau instance that you want to sign in to.
This guide will walk you through obtaining the above credentials within Tableau.
### Prerequisites:
* You must have an active Tableau instance.
### Instructions:
#### Step 1: Enabling Personal Access Token
* If this is enabled, you can skip to [step 2](#step-2%3A-generating-your-personal-access-token) below.
1. Log in to your Tableau instance and naviagate to **Settings** > **General**.
2. Scroll down to **Personal Access Tokens** section.
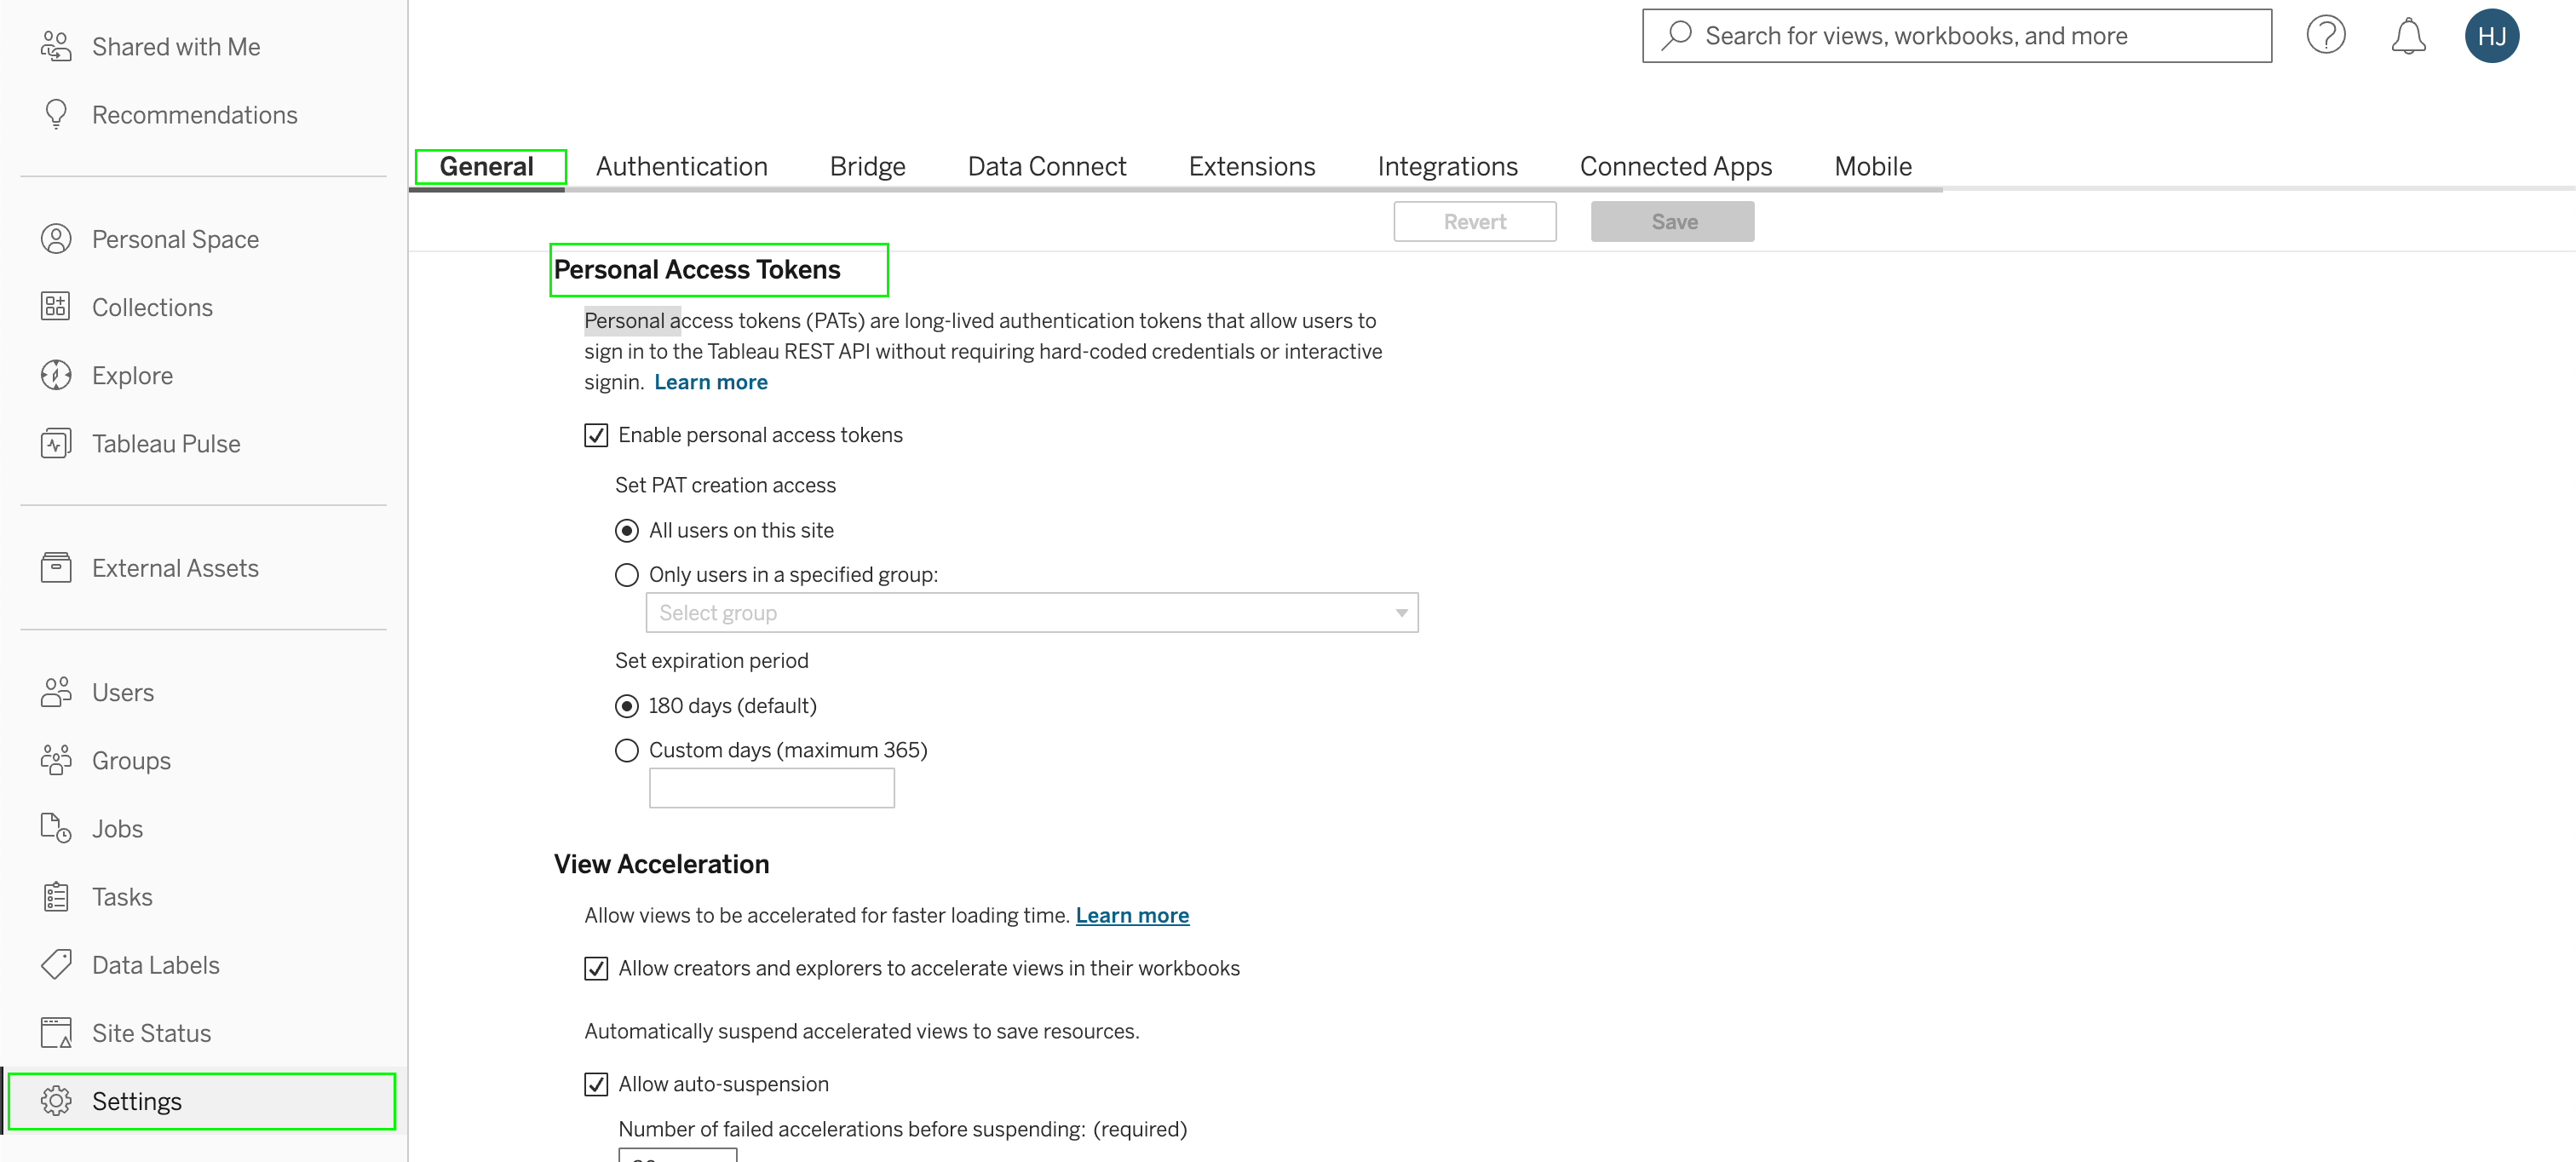 3. Ensure the **Enable personal access tokens** checkbox is selected. You can choose to either allow all users to create PATs or limit access to a specified group.
4. If restricting access to a group, select the **Only users in the specified group** radio button and choose the relevant group from the list. Note that a group must be selected to save this setting.
5. Under **Set expiration period**, opt for either the **180 days** radio button or enter a custom value (1 through 365) in the **Custom days** text box.
6. Once configured, click the **Save** button at the top or bottom of the page to apply the changes.
#### Step 2: Generating your Personal Access Token
1. Once you've confirmed that **Personal Access Tokens** are enabled, click on your profile icon at the top right, then select **My Account Settings**.
2. Navigate to the **Settings** tab, then scroll down to **Personal Access Tokens** section.
3. Enter a name for your **Personal Access Token**, this will serve as your token's identifier, then click **Create Token**.
3. Ensure the **Enable personal access tokens** checkbox is selected. You can choose to either allow all users to create PATs or limit access to a specified group.
4. If restricting access to a group, select the **Only users in the specified group** radio button and choose the relevant group from the list. Note that a group must be selected to save this setting.
5. Under **Set expiration period**, opt for either the **180 days** radio button or enter a custom value (1 through 365) in the **Custom days** text box.
6. Once configured, click the **Save** button at the top or bottom of the page to apply the changes.
#### Step 2: Generating your Personal Access Token
1. Once you've confirmed that **Personal Access Tokens** are enabled, click on your profile icon at the top right, then select **My Account Settings**.
2. Navigate to the **Settings** tab, then scroll down to **Personal Access Tokens** section.
3. Enter a name for your **Personal Access Token**, this will serve as your token's identifier, then click **Create Token**.
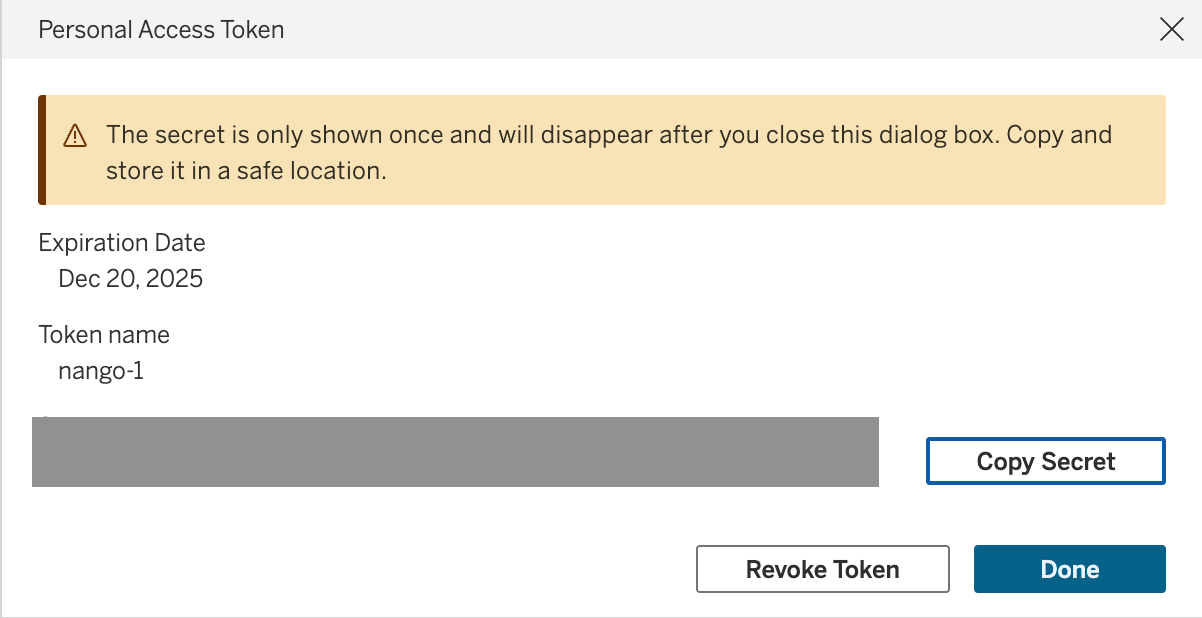 4. A secret will be generated, this is your **Personal Access Token Secret**. Make sure to copy and store it securely, as it will not be shown again.
#### Step 3: Finding your HostName
* Look at your browser’s address bar. Your **Hostname** is everything that appears after `https://` and before `/#/`. For example, if your URL is: `https://dub01.online.tableau.com/#/site/test-eaec4a3fe2/user/external/dummy@nango.dev.com/settings`, your **HostName** is `dub01.online.tableau.com`.
#### Step 4: Finding your API Version
* This is the **REST API version** you want to connect to. You can find the full list of supported versions [here](https://help.tableau.com/current/api/rest_api/en-us/REST/rest_api_concepts_versions.htm).
#### Step 5: Finding your Content Url
* Look at your browser’s address bar. Your **Content URL** is the value that appears immediately after `/site/` and before the next `/`. For example, if your URL is:`https://dub01.online.tableau.com/#/site/test-eaec4a3fe2/user/external/dummy@nango.dev.com/settings`, your **Content Url** is `test-eaec4a3fe2`.
For **Tableau Server**, you can leave this field blank to use the default site. For **Tableau Cloud**, a valid **Content URL** is required.
#### Step 6: Enter credentials in the Connect UI
Once you have your credential:
1. Open the form where you need to authenticate with Tableau.
2. Enter your credentials in their respective fields.
3. Submit the form, and you should be successfully authenticated.
4. A secret will be generated, this is your **Personal Access Token Secret**. Make sure to copy and store it securely, as it will not be shown again.
#### Step 3: Finding your HostName
* Look at your browser’s address bar. Your **Hostname** is everything that appears after `https://` and before `/#/`. For example, if your URL is: `https://dub01.online.tableau.com/#/site/test-eaec4a3fe2/user/external/dummy@nango.dev.com/settings`, your **HostName** is `dub01.online.tableau.com`.
#### Step 4: Finding your API Version
* This is the **REST API version** you want to connect to. You can find the full list of supported versions [here](https://help.tableau.com/current/api/rest_api/en-us/REST/rest_api_concepts_versions.htm).
#### Step 5: Finding your Content Url
* Look at your browser’s address bar. Your **Content URL** is the value that appears immediately after `/site/` and before the next `/`. For example, if your URL is:`https://dub01.online.tableau.com/#/site/test-eaec4a3fe2/user/external/dummy@nango.dev.com/settings`, your **Content Url** is `test-eaec4a3fe2`.
For **Tableau Server**, you can leave this field blank to use the default site. For **Tableau Cloud**, a valid **Content URL** is required.
#### Step 6: Enter credentials in the Connect UI
Once you have your credential:
1. Open the form where you need to authenticate with Tableau.
2. Enter your credentials in their respective fields.
3. Submit the form, and you should be successfully authenticated.
 You are now connected to Tableau.