> ## Documentation Index
> Fetch the complete documentation index at: https://nango-marcin-get-deployments-docs.mintlify.site/llms.txt
> Use this file to discover all available pages before exploring further.
# Salesforce (Data Cloud) - How do I link my account?
# Overview
To authenticate with Salesforce (Data Cloud), you need:
1. **Encoded JWT** - A unique string that enables client applications to access Salesforce (Data Cloud) resources without requiring users to provide their credentials.
This guide will walk you through generating your encoded JWT within Salesforce.
### Prerequisites:
* You must have a Salesforce account with an active Data Cloud subscription.
### Instructions:
#### Step 1: Generating your Encoded JWT
* Interacting with the Data Cloud API requires a signed digital certificate. You can use a private key and certificate issued by a certification authority. Alternatively, you can use OpenSSL to create a key and a self-signed digital certificate. Here's how to create a self-signed certificate with OpenSSL.
1. Run the following command to generate a 2048-bit RSA private key:
```
openssl genrsa 2048 > host.key && chmod 400 host.key
```
2. Use the private key to sign a certificate. Enter details about the certificate, or press Enter at each prompt to accept the default value:
```
openssl req -new -x509 -nodes -sha256 -days 365 -key host.key -out host.crt
```
* Now that you have created the above signed certificate, you will now need to create an app in Salesforce and upload the above signed certificate.
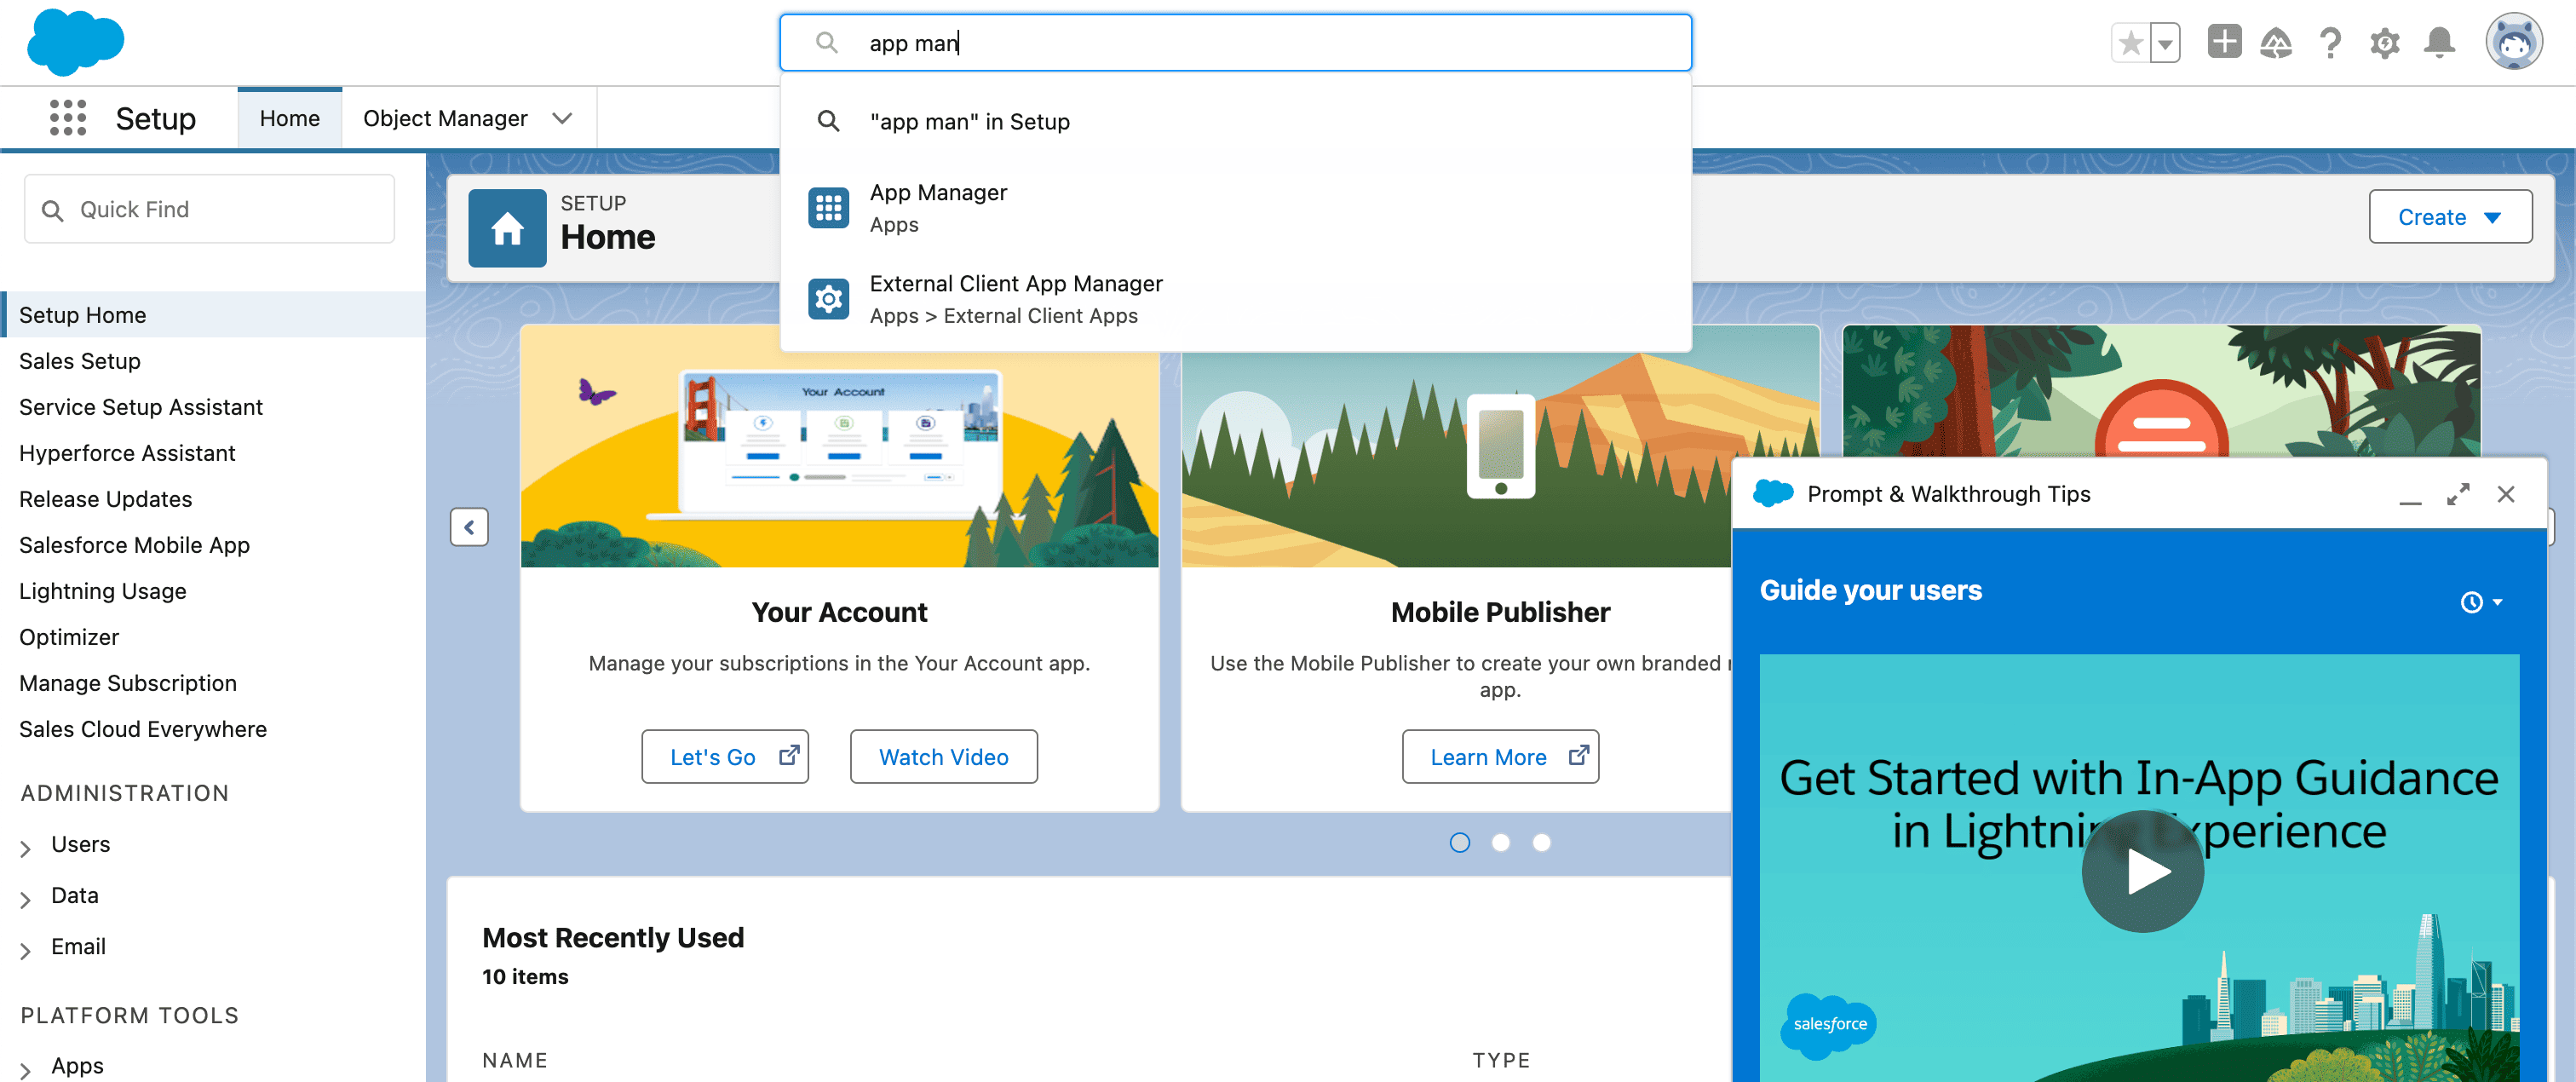
3. Login to your salesforce account and In the Setup, in the Quick Find box, enter apps, and then select **App Manager**.
 4. Click **New Connected App**.
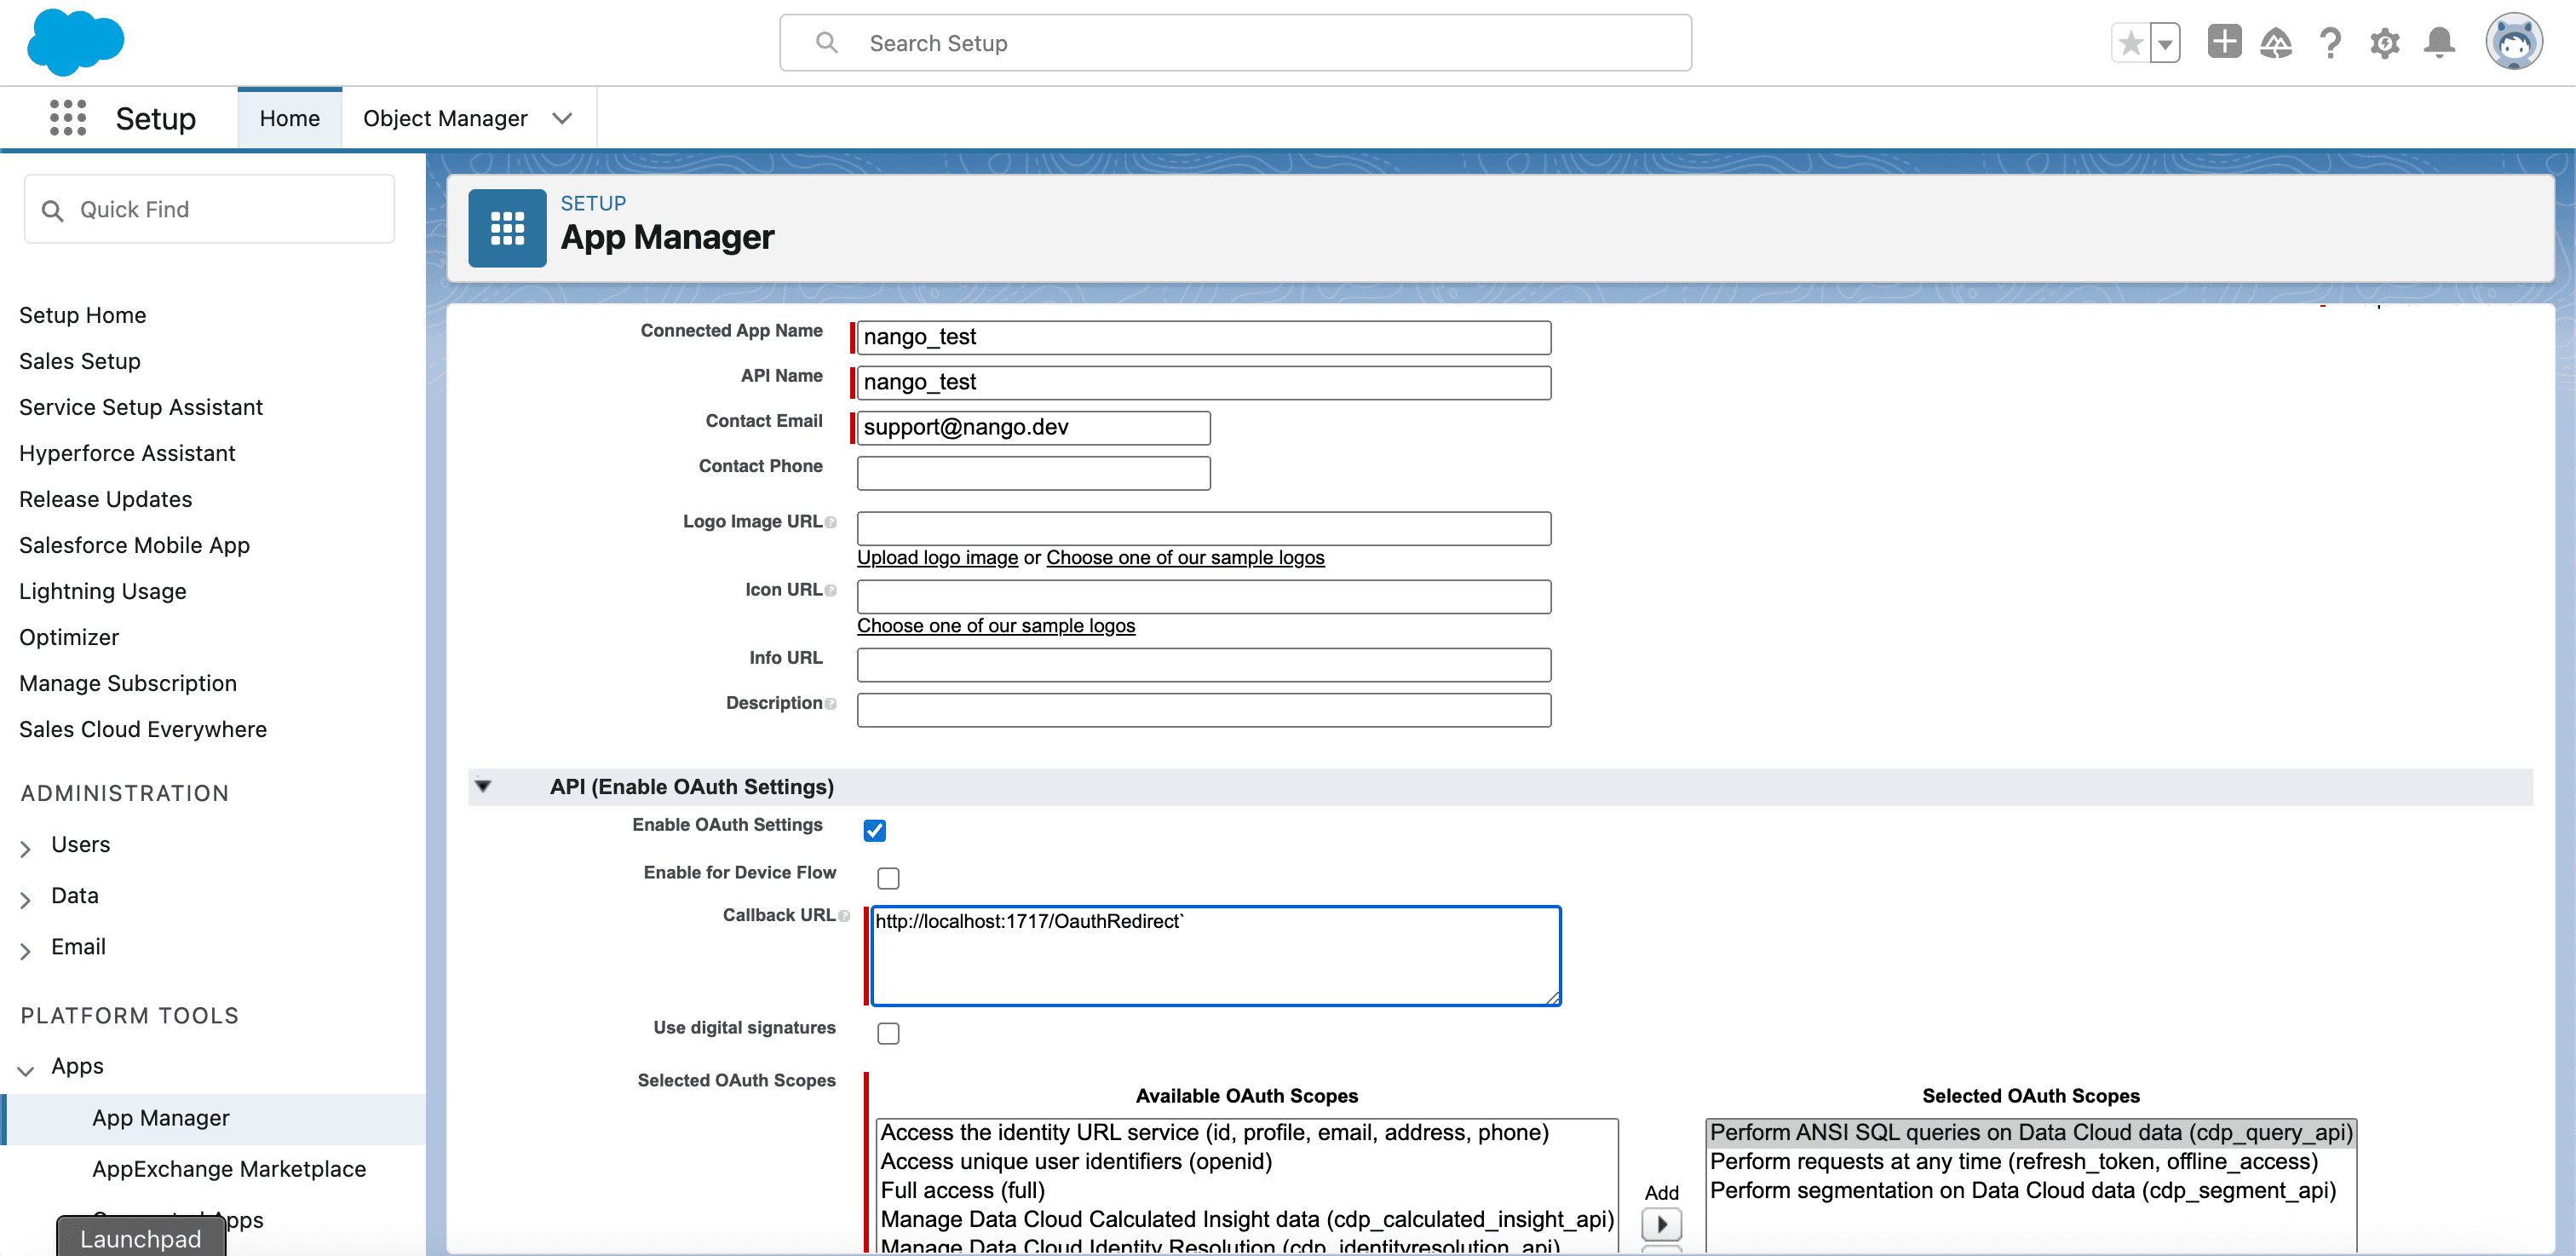
5. For Connected App Name, enter an app name and your email address.
6. Select **Enable OAuth Settings**.
7. For **Callback URL**, enter `http://localhost:1717/OauthRedirect`.
8. Select Use **digital signatures**, and then click **Browse**.
9. Select your above self-signed certificate **(host.crt)**.
10. Add the OAuth scopes that are necessary for your use case. For example, if your use case requires you to ingest content, add the **Manage Data Cloud Ingestion API data (cdp\_ingest\_api)** scope.
11. Click **Save**.
4. Click **New Connected App**.
5. For Connected App Name, enter an app name and your email address.
6. Select **Enable OAuth Settings**.
7. For **Callback URL**, enter `http://localhost:1717/OauthRedirect`.
8. Select Use **digital signatures**, and then click **Browse**.
9. Select your above self-signed certificate **(host.crt)**.
10. Add the OAuth scopes that are necessary for your use case. For example, if your use case requires you to ingest content, add the **Manage Data Cloud Ingestion API data (cdp\_ingest\_api)** scope.
11. Click **Save**.
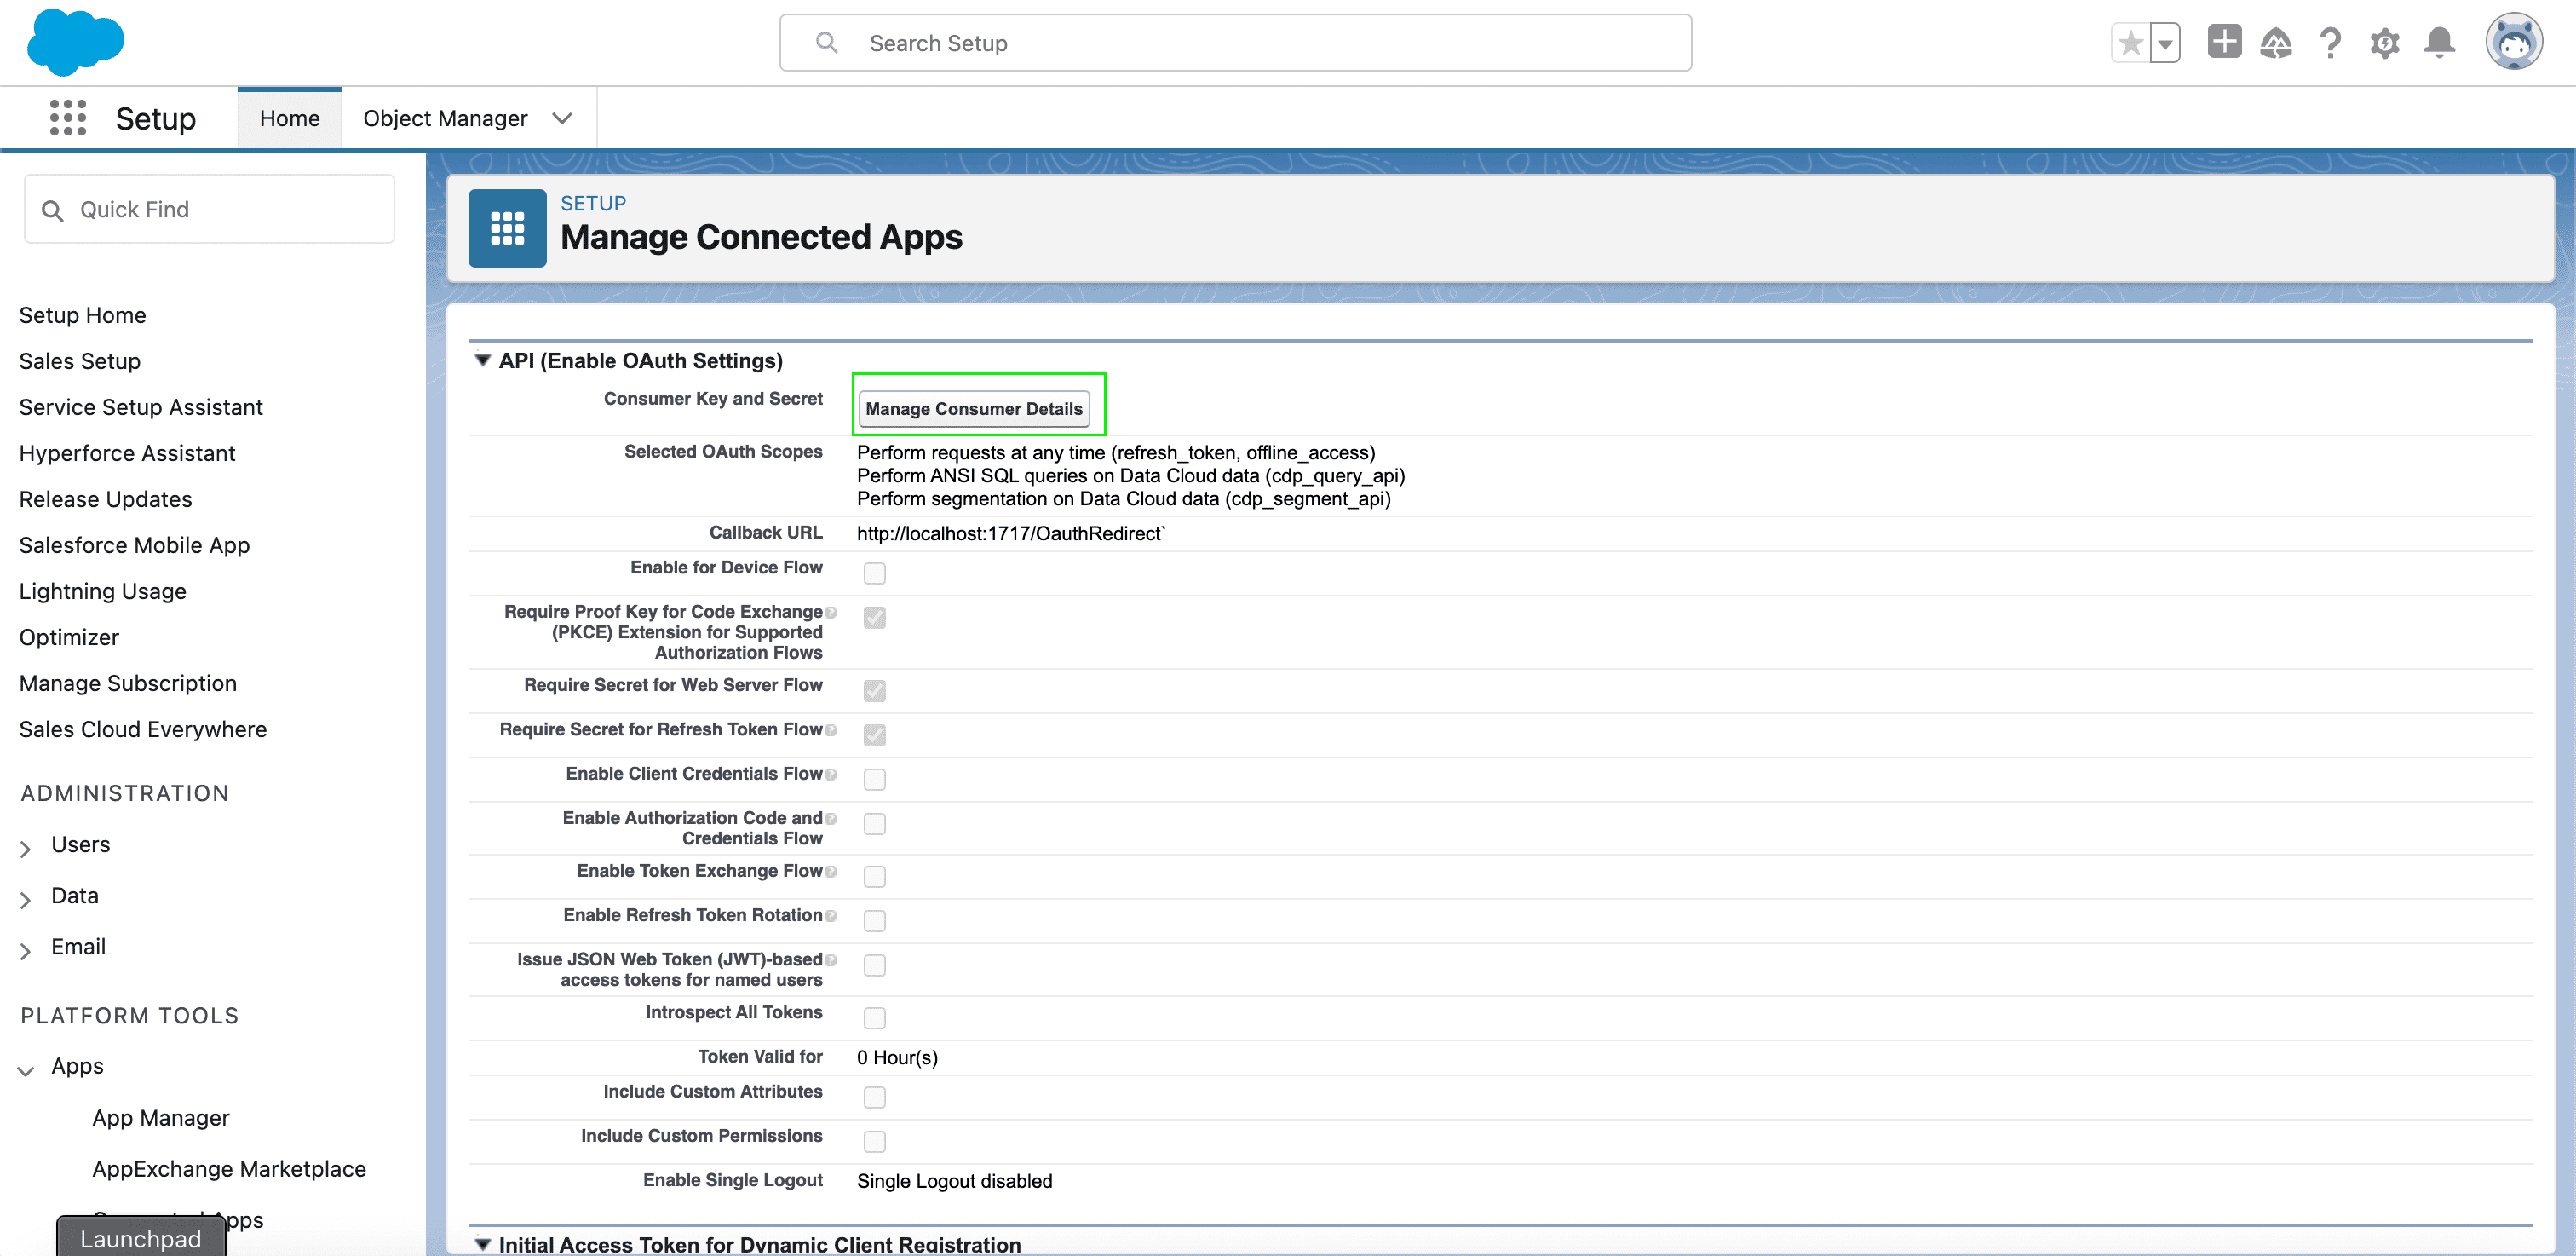
 12. Click **Manage Consumer Details**.
 13. Copy the **Consumer Key** value. This value is also referred to as the **client ID**. You will use the client ID value when you are generaying your encoded (JWT) in the step below.
14. Now that your certificate is registered with Salesforce, you need to generate an encoded JWT. You can use the code from the following script to generate your encoded JWT offline.
```
import { readFileSync } from 'fs';
import jwt from 'jsonwebtoken';
import readlineSync from 'readline-sync';
const getUserInput = () => {
const clientId = readlineSync.question('Please enter your Salesforce client ID: ');
const username = readlineSync.question('Please enter your Salesforce username: ');
return { clientId, username };
};
const readPrivateKey = (path) => {
try {
return readFileSync(path, 'utf8');
} catch (error) {
console.error(`Error reading private key from ${path}:`, error);
throw error;
}
};
const createJwtClaims = (clientId, username) => {
const currentTime = Math.floor(Date.now() / 1000);
const expiry = currentTime + (10 * 365 * 24 * 60 * 60);
return {
iss: clientId,
sub: username,
aud: 'https://login.salesforce.com',
exp: expiry,
};
};
const generateJwtToken = (claims, privateKey) => {
try {
return jwt.sign(claims, privateKey, { algorithm: 'RS256' })
} catch (error) {
console.error('Error signing assertion:', error);
throw error;
}
};
const generateJwtAssertion = () => {
const { clientId, username } = getUserInput();
const privateKeyPath = 'host.key';
const privateKey = readPrivateKey(privateKeyPath);
const claims = createJwtClaims(clientId, username);
const token = generateJwtToken(claims, privateKey);
console.log('Generated Salesforce assertion:', token);
};
generateJwtAssertion();
```
* Run the script above in the same directory where your certificates were generated. It will prompt you for your **Client ID** obtained when creating a connected app and your **Username**, used when signing in to Salesforce. An encoded JWT will then be generated.
**Note**: The generated **Encoded JWT** is valid for ten years. After this period, you will need to regenerate your encoded JWT and reauthenticate.
#### Step 2: Enter credentials in the Connect UI
Once you have your **Encoded JWT**:
1. Open the form where you need to authenticate with Salesforce (Data Cloud).
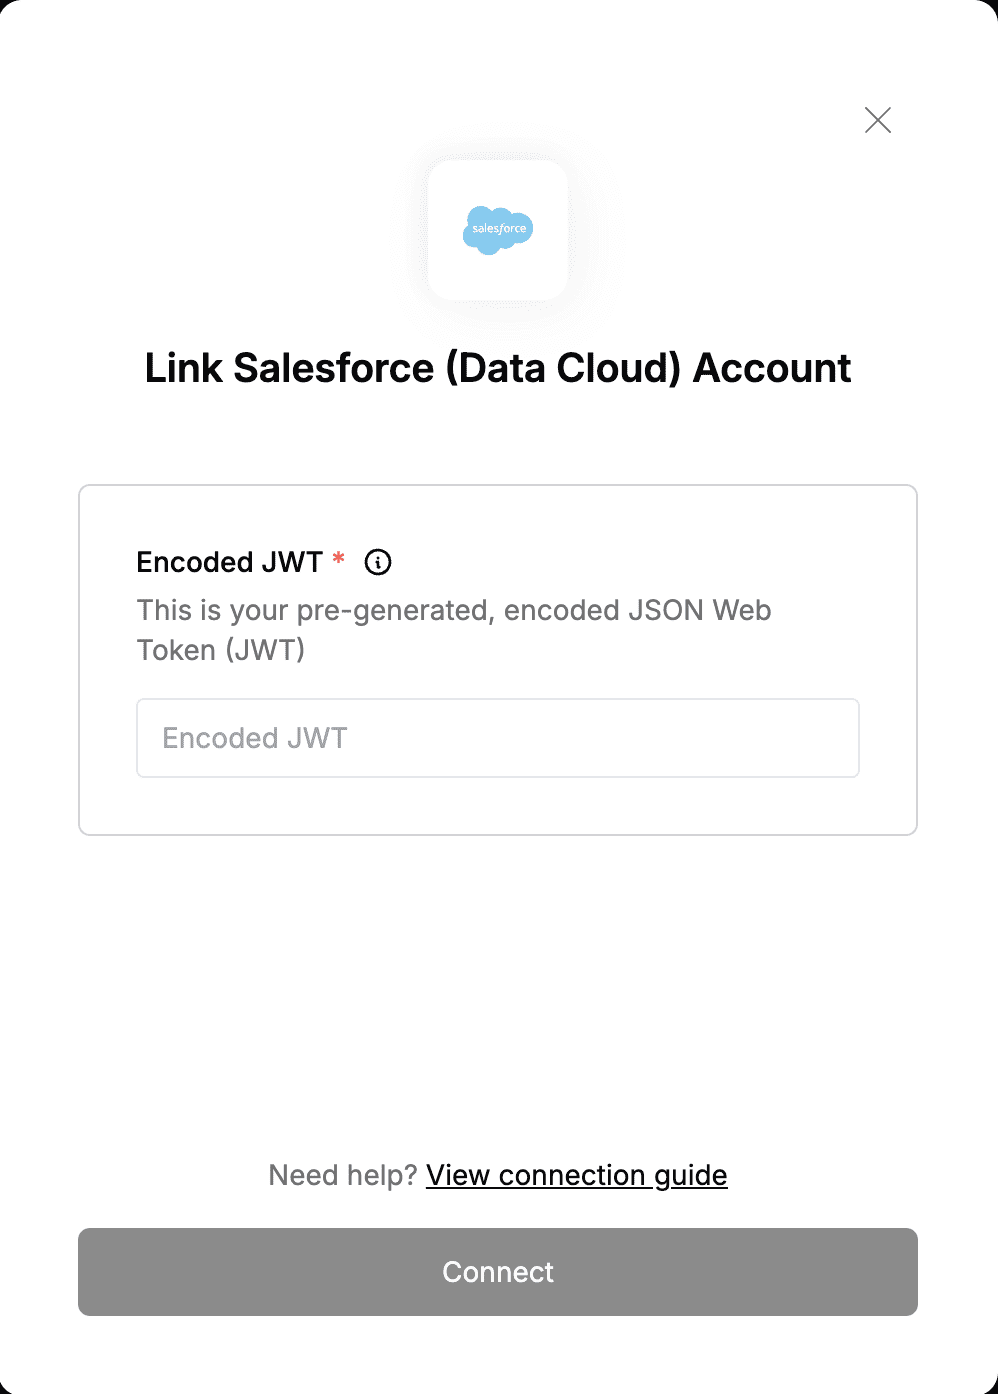
2. Enter your **Encoded JWT** in the designated field.
3. Submit the form, and you should be successfully authenticated.
13. Copy the **Consumer Key** value. This value is also referred to as the **client ID**. You will use the client ID value when you are generaying your encoded (JWT) in the step below.
14. Now that your certificate is registered with Salesforce, you need to generate an encoded JWT. You can use the code from the following script to generate your encoded JWT offline.
```
import { readFileSync } from 'fs';
import jwt from 'jsonwebtoken';
import readlineSync from 'readline-sync';
const getUserInput = () => {
const clientId = readlineSync.question('Please enter your Salesforce client ID: ');
const username = readlineSync.question('Please enter your Salesforce username: ');
return { clientId, username };
};
const readPrivateKey = (path) => {
try {
return readFileSync(path, 'utf8');
} catch (error) {
console.error(`Error reading private key from ${path}:`, error);
throw error;
}
};
const createJwtClaims = (clientId, username) => {
const currentTime = Math.floor(Date.now() / 1000);
const expiry = currentTime + (10 * 365 * 24 * 60 * 60);
return {
iss: clientId,
sub: username,
aud: 'https://login.salesforce.com',
exp: expiry,
};
};
const generateJwtToken = (claims, privateKey) => {
try {
return jwt.sign(claims, privateKey, { algorithm: 'RS256' })
} catch (error) {
console.error('Error signing assertion:', error);
throw error;
}
};
const generateJwtAssertion = () => {
const { clientId, username } = getUserInput();
const privateKeyPath = 'host.key';
const privateKey = readPrivateKey(privateKeyPath);
const claims = createJwtClaims(clientId, username);
const token = generateJwtToken(claims, privateKey);
console.log('Generated Salesforce assertion:', token);
};
generateJwtAssertion();
```
* Run the script above in the same directory where your certificates were generated. It will prompt you for your **Client ID** obtained when creating a connected app and your **Username**, used when signing in to Salesforce. An encoded JWT will then be generated.
**Note**: The generated **Encoded JWT** is valid for ten years. After this period, you will need to regenerate your encoded JWT and reauthenticate.
#### Step 2: Enter credentials in the Connect UI
Once you have your **Encoded JWT**:
1. Open the form where you need to authenticate with Salesforce (Data Cloud).
2. Enter your **Encoded JWT** in the designated field.
3. Submit the form, and you should be successfully authenticated.
 You are now connected to Salesforce (Data Cloud).