> ## Documentation Index
> Fetch the complete documentation index at: https://nango-marcin-get-deployments-docs.mintlify.site/llms.txt
> Use this file to discover all available pages before exploring further.
# ServiceNow (Client Credentials) - How do I link my account?
# Overview
To authenticate with ServiceNow using Client Credentials, you need:
1. **Subdomain** - Your ServiceNow instance subdomain (e.g., `dev12345` for `dev12345.service-now.com`).
2. **Client ID** - The unique identifier for your OAuth application.
3. **Client Secret** - A confidential key used to authenticate the application.
This guide will walk you through configuring OAuth 2.0 Client Credentials in ServiceNow and obtaining your credentials.
### Prerequisites:
* You must have a ServiceNow instance (Washington DC release or later)
* You must have admin access to configure OAuth settings
### Instructions:
#### Step 1: Enable Client Credentials Grant Type
Client Credentials must be enabled at the instance level:
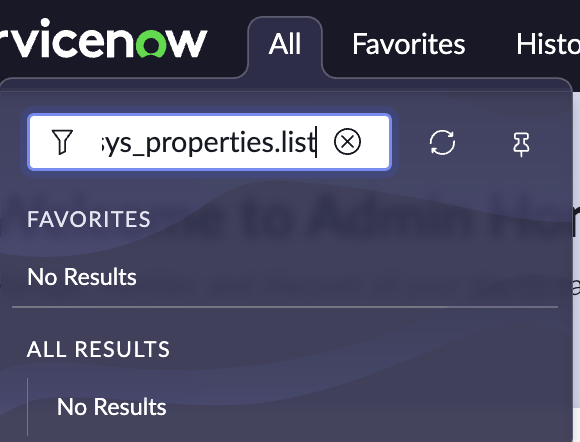
1. In ServiceNow, navigate to **sys\_properties.list** (this won't appear under the "All" menu - type it in the navigation filter and press *Enter* to be redirected).
 2. Search for `glide.oauth.inbound.client.credential.grant_type.enabled`.
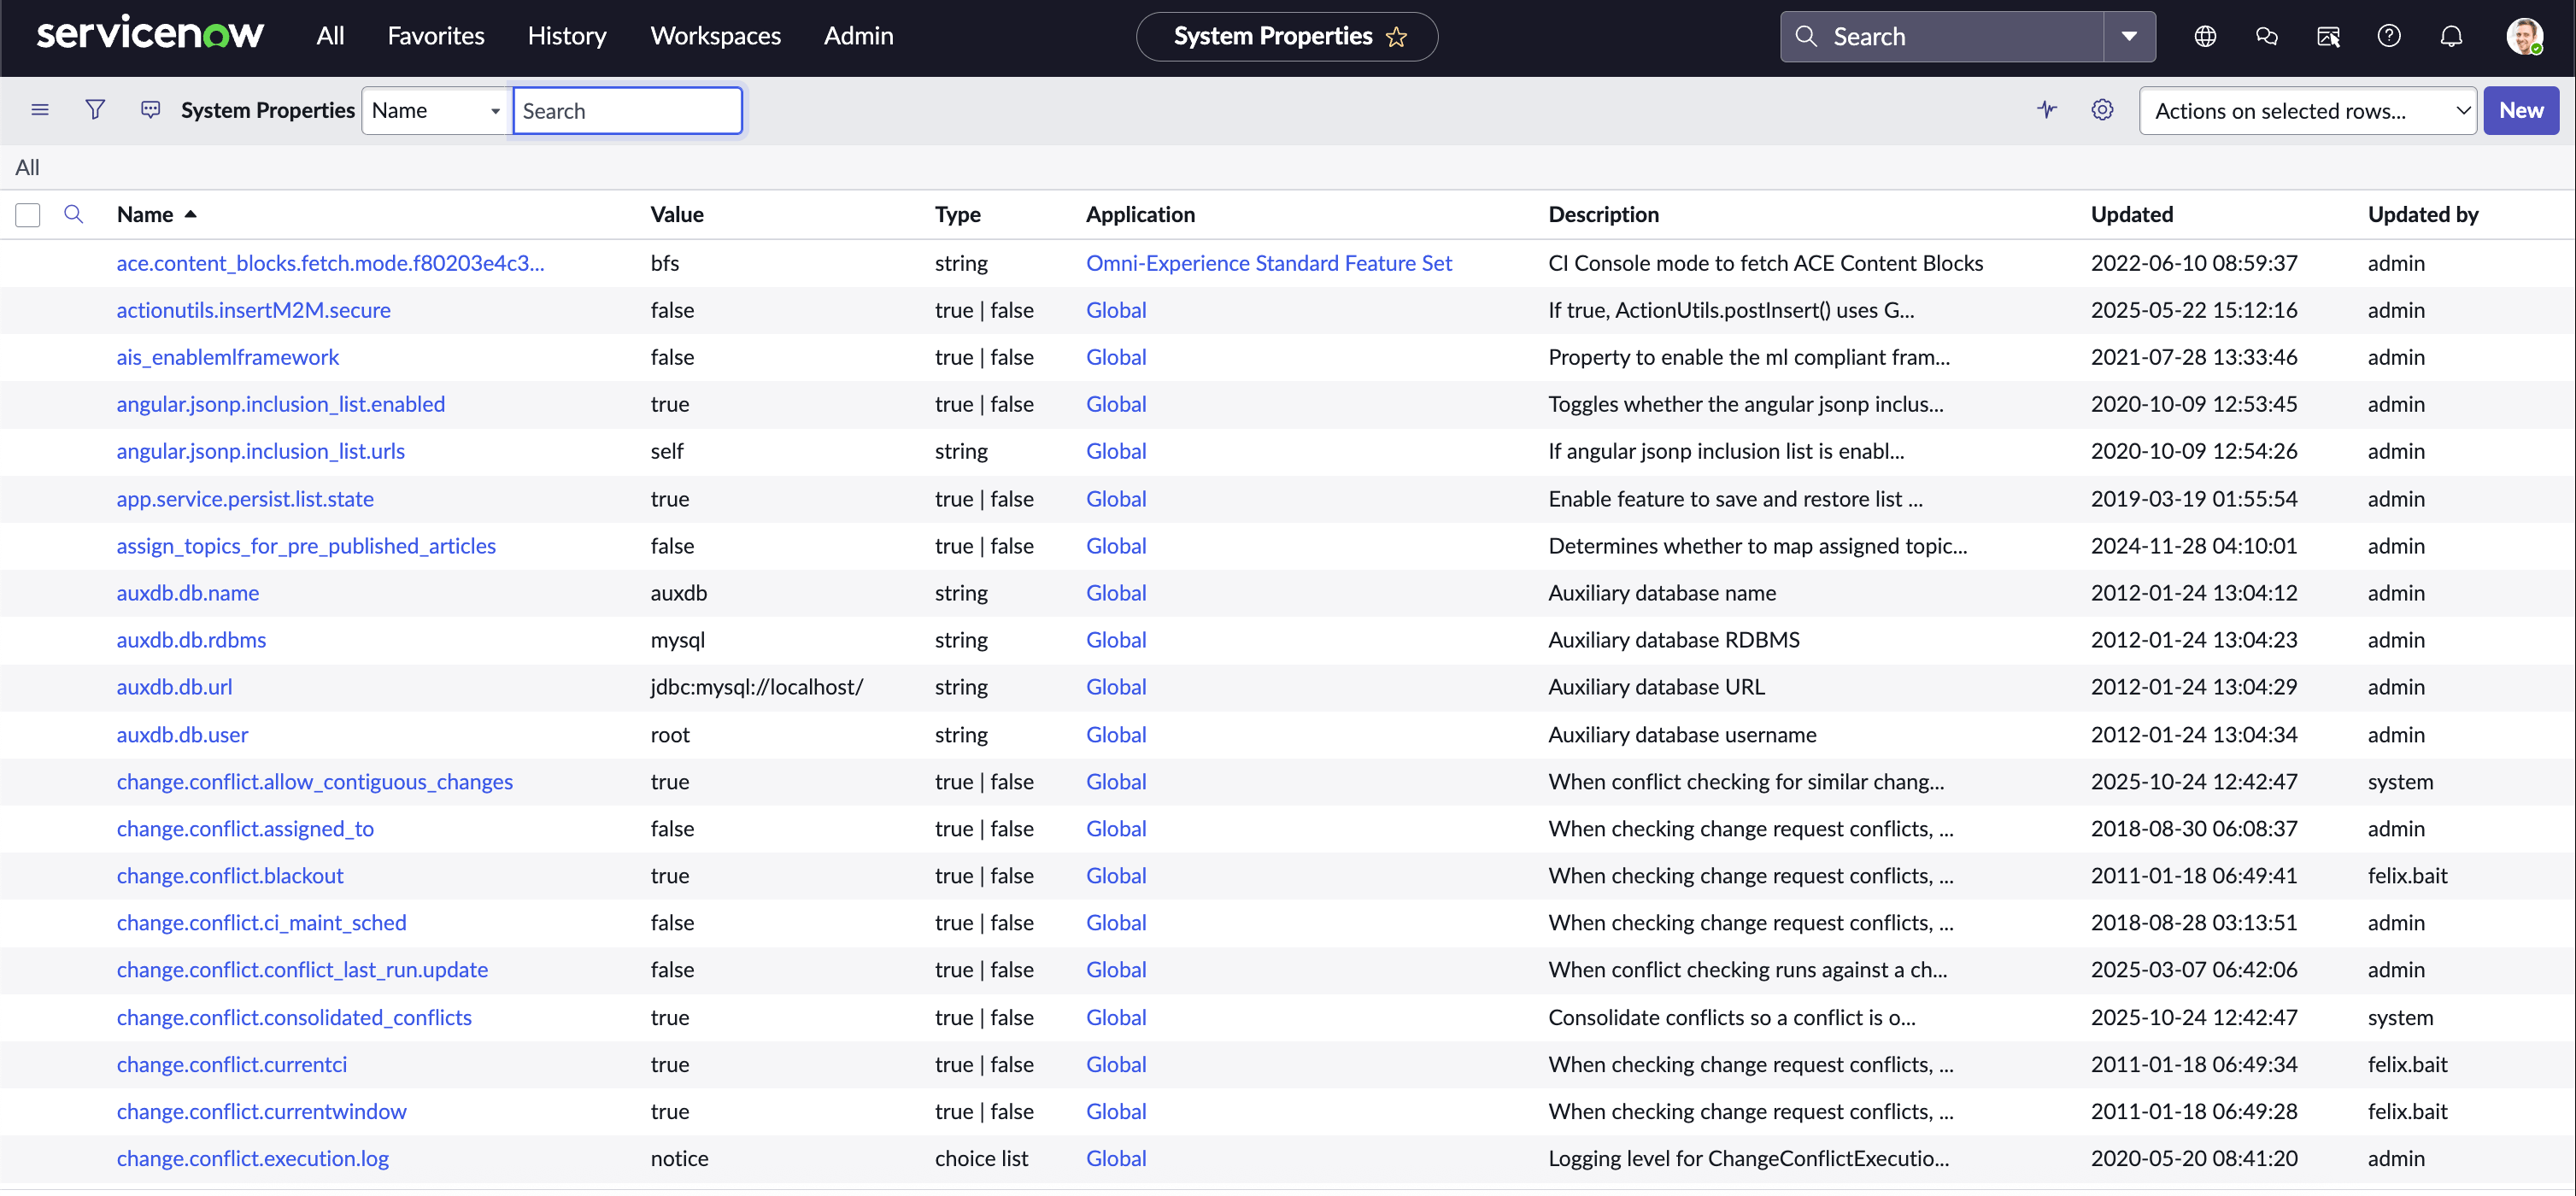 3. If it doesn't exist, click **New** and create it:
* **Name**: `glide.oauth.inbound.client.credential.grant_type.enabled`
* **Type**: `true | false`
* **Value**: `true`
4. Click **Save**.
#### Step 2: Create an OAuth Application User
This is the service account identity that API calls will be made as:
1. Navigate to **User Administration** > **Users**.
2. Click **New** and configure:
* **User ID**: `nango_integration` (or your preferred name)
* **First name**: `Nango`
* **Last name**: `Integration`
* **Active**: Checked
* **Web service access only**: Checked (recommended)
3. Click **Submit**.
4. Open the newly created user and go to the **Roles** tab.
5. Click **Edit** and add these roles:
* `rest_service` - Required for REST API access
* `itil` - Required for incident/change request creation
6. Click **Save**.
#### Step 3: Create an API Authentication Scope
1. Navigate to **System OAuth** > **REST API Auth Scope**.
2. Click **New** and configure:
* **Name**: `nango_api_access`
* **Active**: Checked
* **REST API**: `Table API` or whichever API you need to target.
* **REST API PATH**: `now/table`
* Check: **Apply auth scope to all HTTP methods in this API**
3. Click **Submit**.
#### Step 4: Create an OAuth Application
1. Navigate to **System OAuth** > **Application Registry**.
2. Click **New** > **Create an OAuth API endpoint for external clients**.
3. **Important**: The default form view doesn't show all required fields. To add them:
* Click on the burger icon next to "Application Registries"
3. If it doesn't exist, click **New** and create it:
* **Name**: `glide.oauth.inbound.client.credential.grant_type.enabled`
* **Type**: `true | false`
* **Value**: `true`
4. Click **Save**.
#### Step 2: Create an OAuth Application User
This is the service account identity that API calls will be made as:
1. Navigate to **User Administration** > **Users**.
2. Click **New** and configure:
* **User ID**: `nango_integration` (or your preferred name)
* **First name**: `Nango`
* **Last name**: `Integration`
* **Active**: Checked
* **Web service access only**: Checked (recommended)
3. Click **Submit**.
4. Open the newly created user and go to the **Roles** tab.
5. Click **Edit** and add these roles:
* `rest_service` - Required for REST API access
* `itil` - Required for incident/change request creation
6. Click **Save**.
#### Step 3: Create an API Authentication Scope
1. Navigate to **System OAuth** > **REST API Auth Scope**.
2. Click **New** and configure:
* **Name**: `nango_api_access`
* **Active**: Checked
* **REST API**: `Table API` or whichever API you need to target.
* **REST API PATH**: `now/table`
* Check: **Apply auth scope to all HTTP methods in this API**
3. Click **Submit**.
#### Step 4: Create an OAuth Application
1. Navigate to **System OAuth** > **Application Registry**.
2. Click **New** > **Create an OAuth API endpoint for external clients**.
3. **Important**: The default form view doesn't show all required fields. To add them:
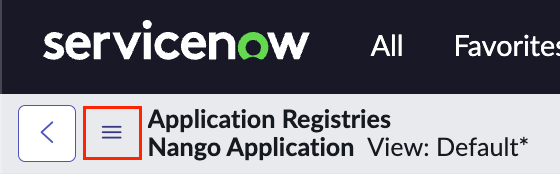
* Click on the burger icon next to "Application Registries"
 * Select **Configure** > **Form Builder**
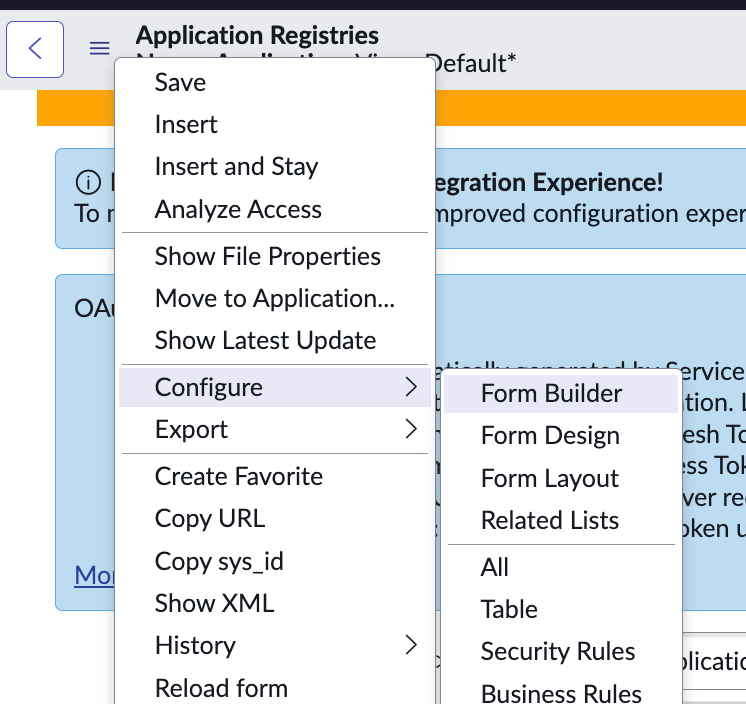 * Add the **OAuth Application User** and **Default Grant Type** fields to the form
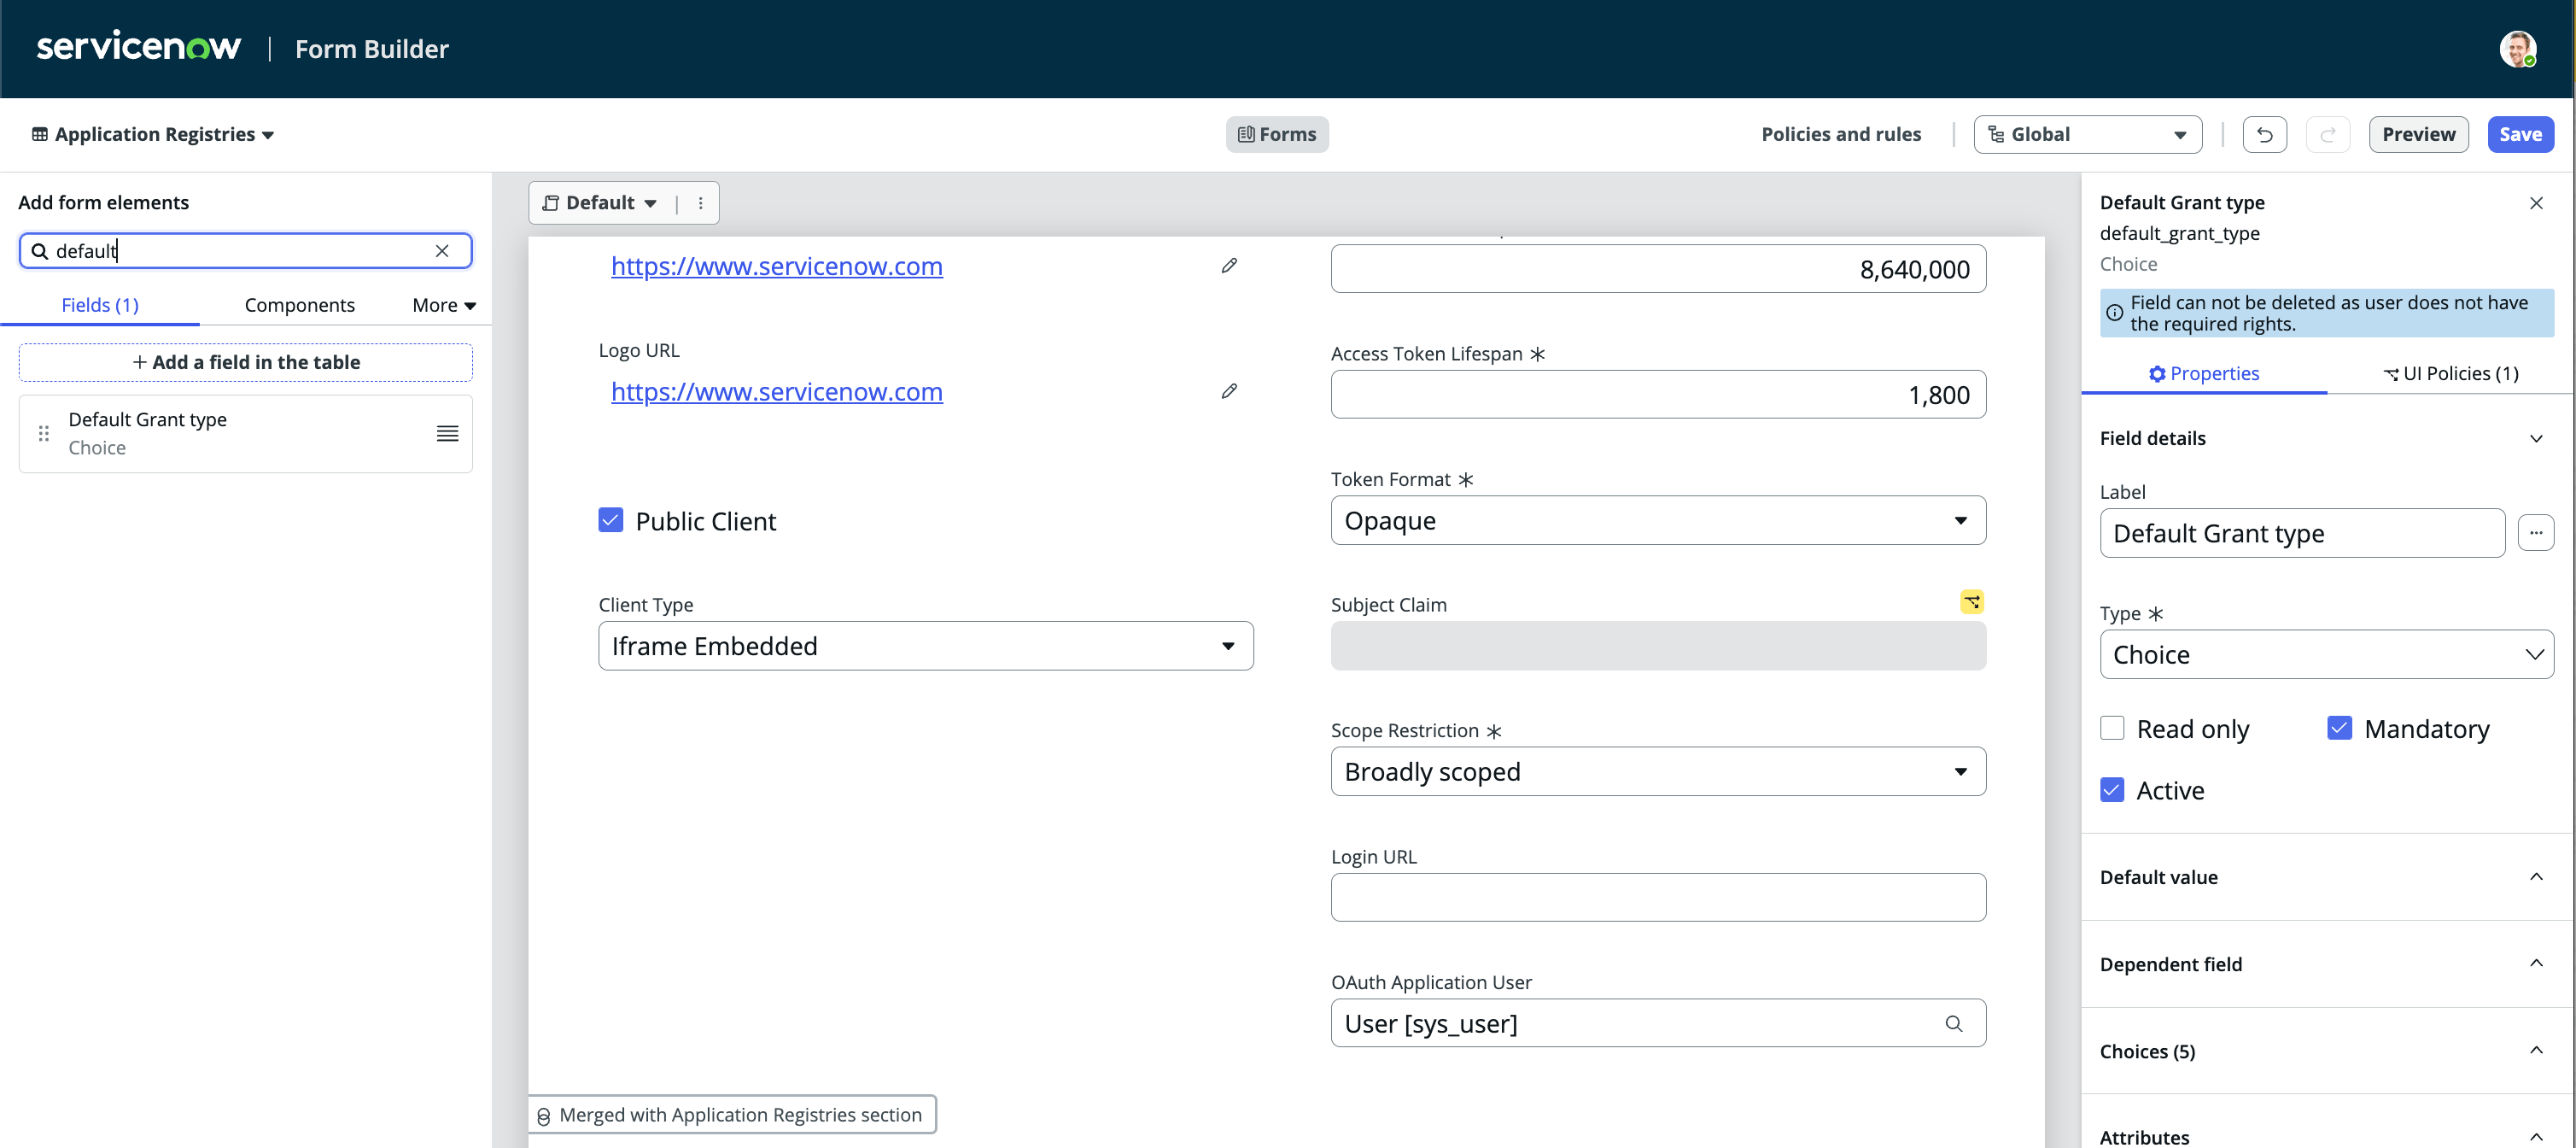 * Save the form layout
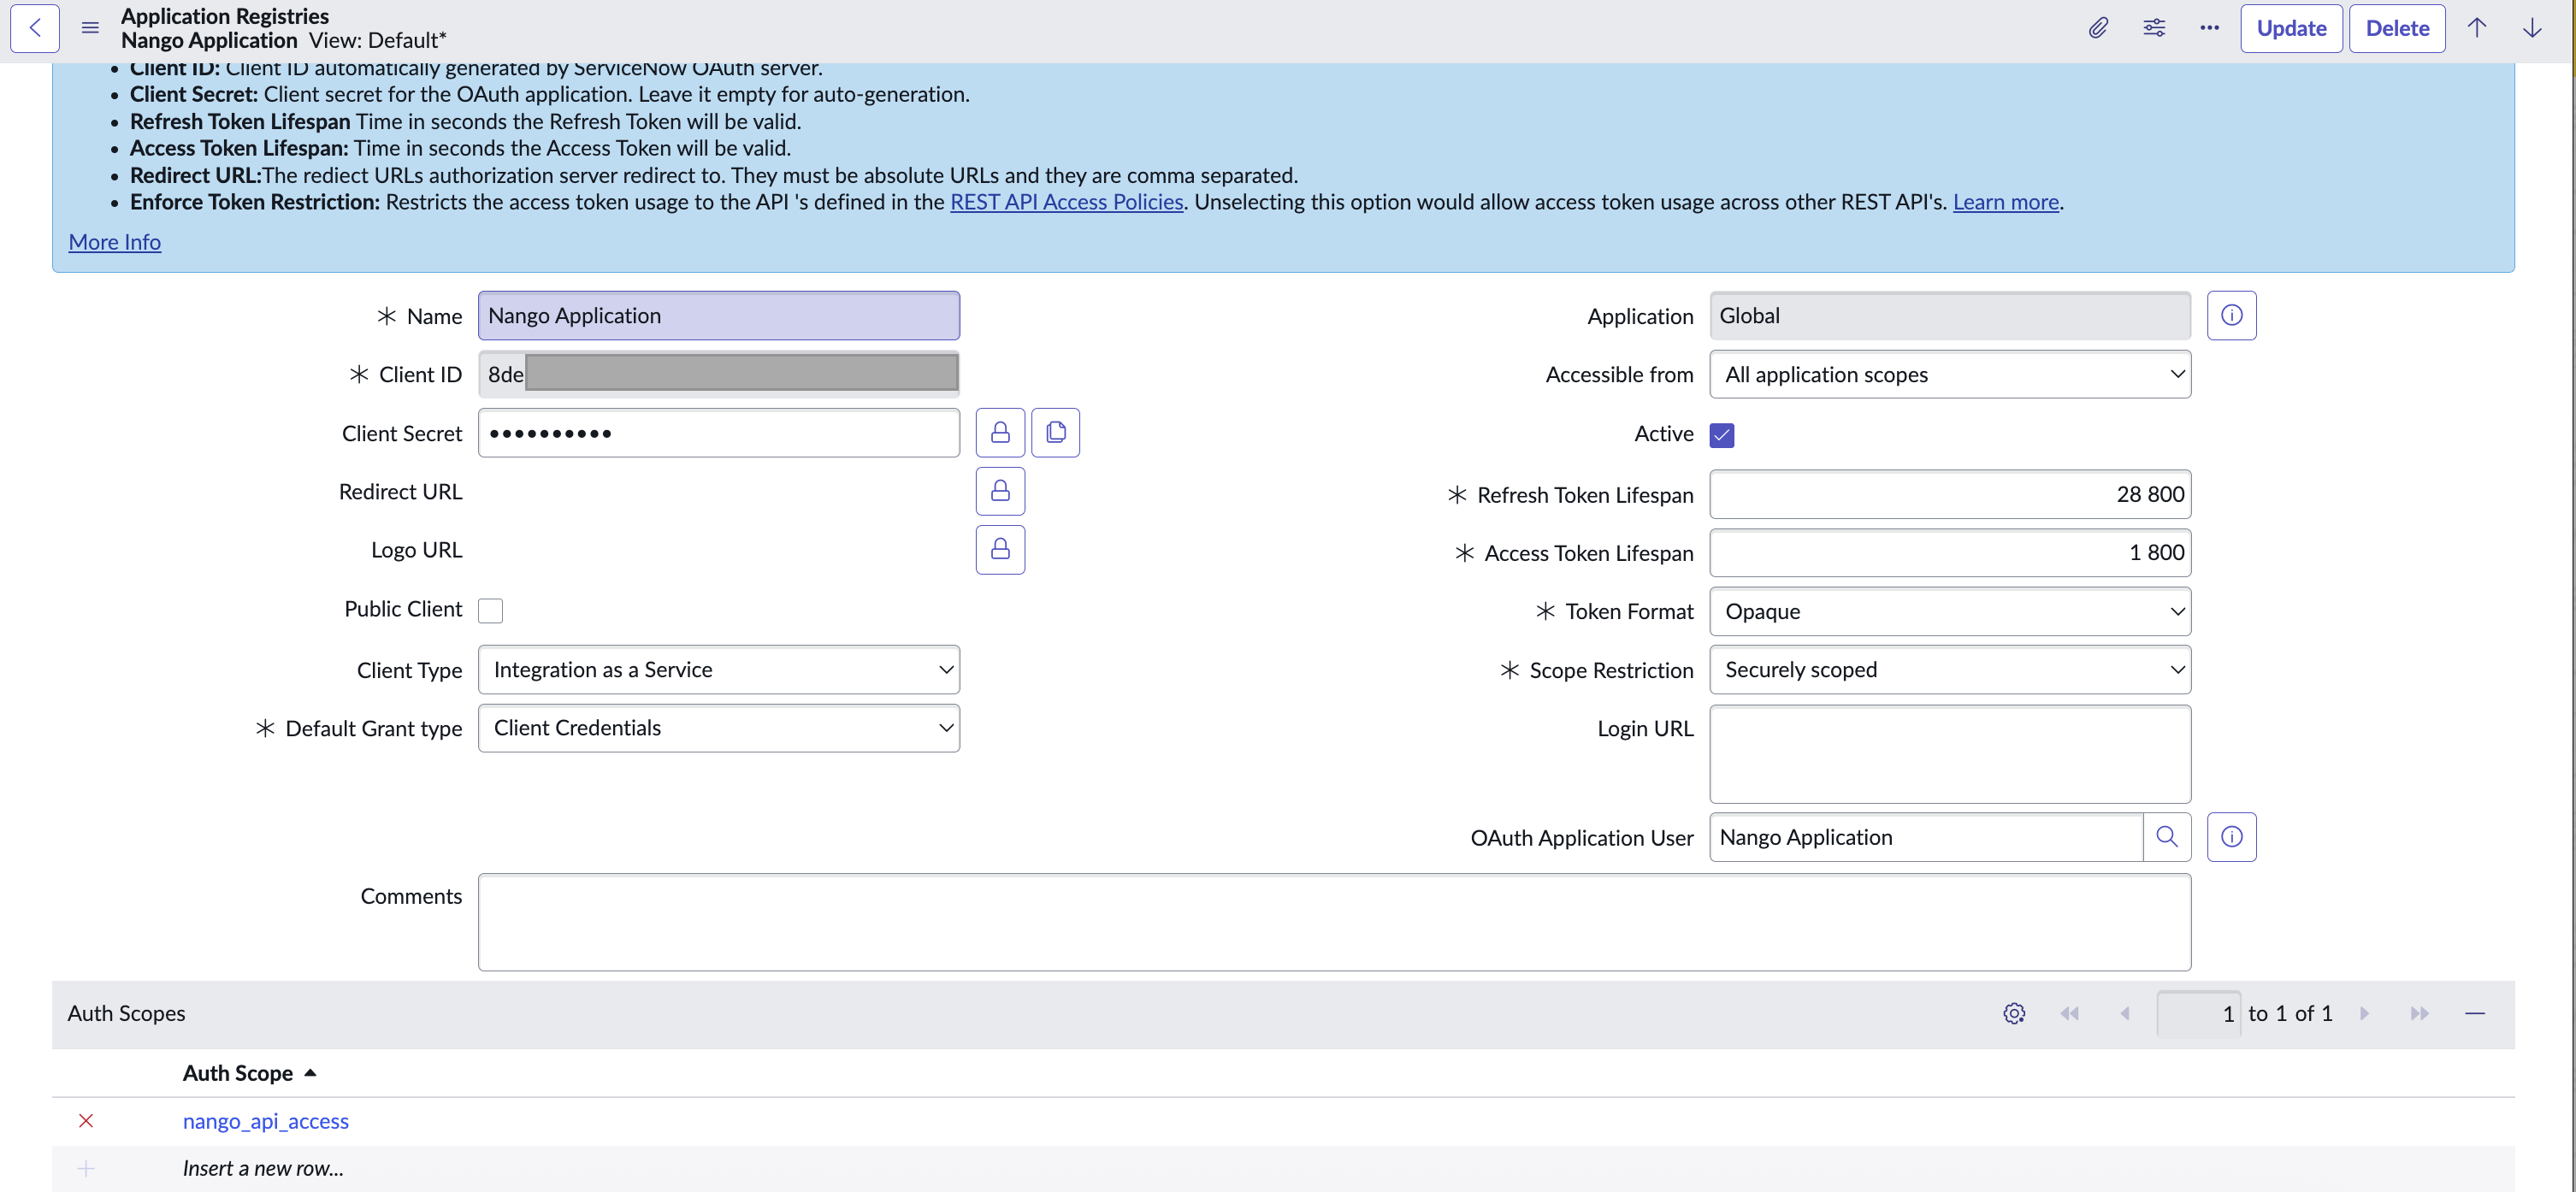
4. Configure the application:
* **Name**: `Nango Integration`
* **Client ID**: Auto-generated (copy this)
* **Client Secret**: Click the lock icon to reveal, then copy
* **Default Grant Type**: `Client Credentials`
* **OAuth Application User**: Select the user created in Step 2
* **Active**: Checked
* Save the form layout
4. Configure the application:
* **Name**: `Nango Integration`
* **Client ID**: Auto-generated (copy this)
* **Client Secret**: Click the lock icon to reveal, then copy
* **Default Grant Type**: `Client Credentials`
* **OAuth Application User**: Select the user created in Step 2
* **Active**: Checked
 5. Click **Submit**.
6. Open the application and go to the **Auth Scopes** related list.
7. Click **Add** and select the scope created in Step 3.
8. Click **Save**.
#### Step 5: Enter credentials in the Connect UI
Once you have your credentials:
1. Open the form where you need to authenticate with ServiceNow.
2. Enter your **Subdomain** (e.g., `dev12345`), **Client ID**, and **Client Secret** in their designated fields.
5. Click **Submit**.
6. Open the application and go to the **Auth Scopes** related list.
7. Click **Add** and select the scope created in Step 3.
8. Click **Save**.
#### Step 5: Enter credentials in the Connect UI
Once you have your credentials:
1. Open the form where you need to authenticate with ServiceNow.
2. Enter your **Subdomain** (e.g., `dev12345`), **Client ID**, and **Client Secret** in their designated fields.
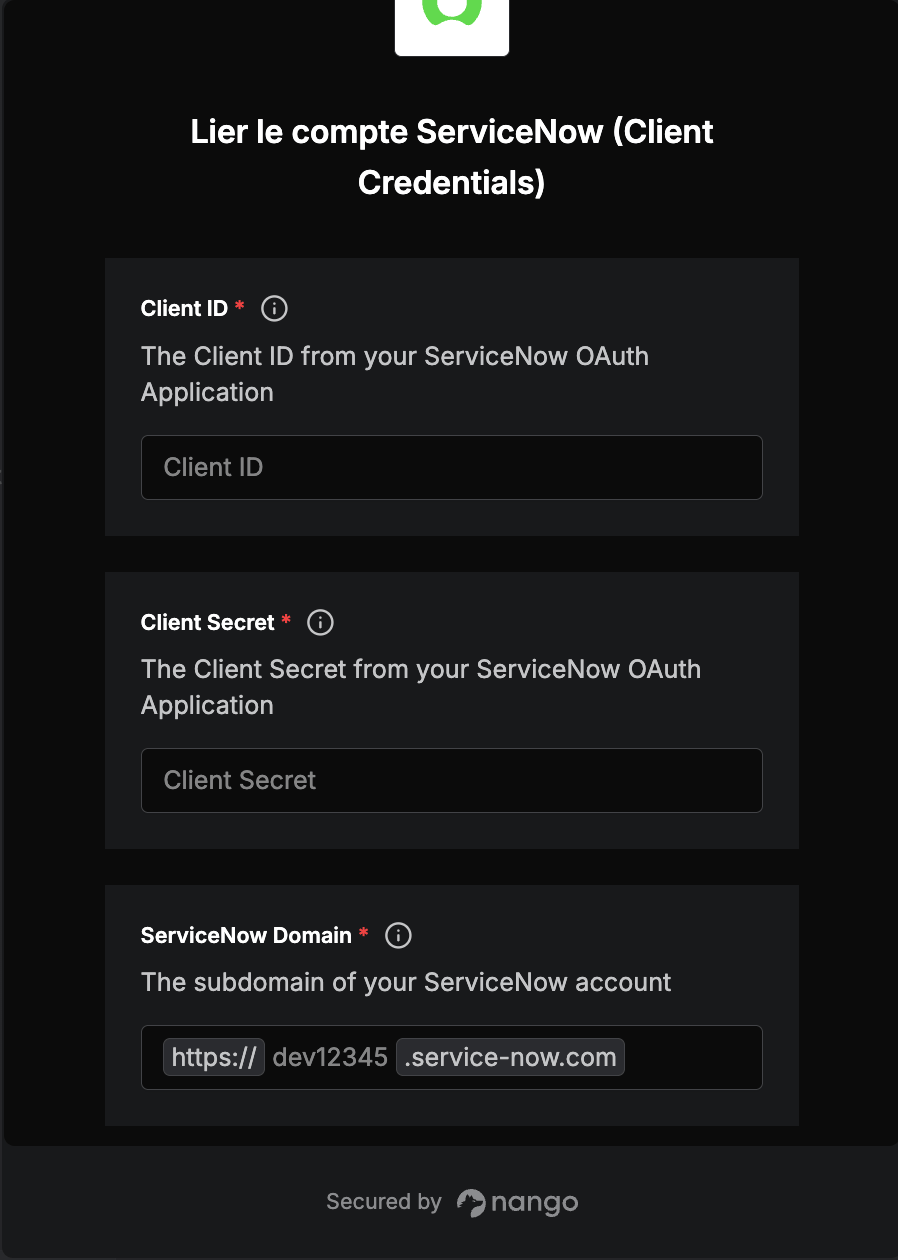 3. Submit the form, and you should be successfully authenticated.
You are now connected to ServiceNow.
3. Submit the form, and you should be successfully authenticated.
You are now connected to ServiceNow.